Configure Zendesk for UserLock Single Sign-On (SSO)
Enable Single Sign-On (SSO) for Zendesk with UserLock to centralize authentication, enforce access policies, and streamline user access to the support portal.
This guide explains how to integrate Zendesk with UserLock Single Sign-On (SSO) using the SAML 2.0 protocol.
Once configured, Zendesk logins are authenticated by UserLock against Active Directory, allowing administrators to enforce UserLock access policies (MFA, time, machine, or location restrictions) on SSO sessions.
🚩️ Before starting:
You must have a Zendesk administrator account.
UserLock SSO must already be installed and configured.
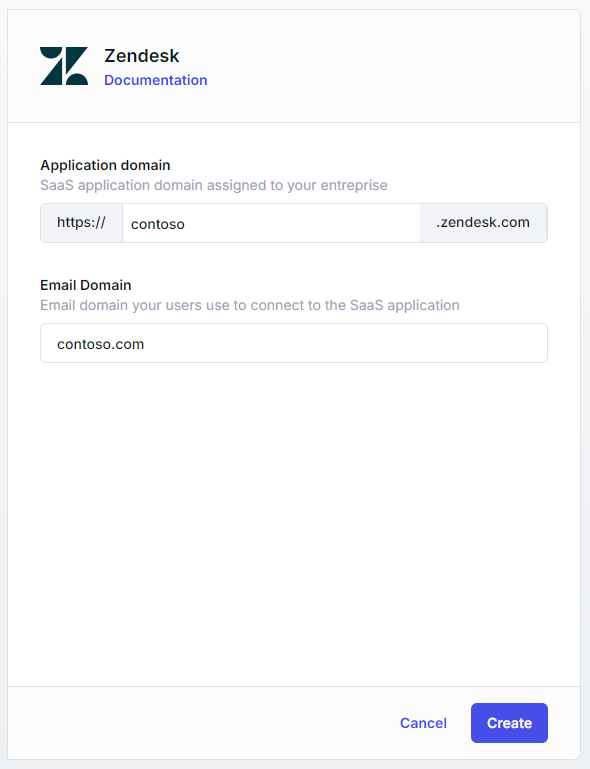
In the UserLock console, go to ⚙️ Server settings ▸ Single Sign-On.
In the list of applications, select Zendesk.
Fill in the fields with the following values:
Settings
Values
Application Domain
Your Zendesk instance domain
(e.g.https://yourdomain.zendesk.com)Email domain
The email domain used by users to sign in (e.g.
contoso.com)Save the profile.
From your Zendesk Admin Center, go to Admin ▸ Settings ▸ Security.
Under the Global tab, click Manage security settings in Admin Center.

Under the Single sign-on tab, locate the SAML section and click Configure.
Complete the form using the following values:
Field
Value
SAML enabled
✅ Checked
SAML SSO URL
https://<SSO_address>/saml/ssoCertificate fingerprint
In the UserLock console, go to ⚙ Server settings ▸ Single Sign-On.
Click on Download ▸ SAML certificate
Open the downloaded file with a text editor (e.g. Notepad) and copy its contents.
Remote logout URL
https://<SSO_address>/connect/endsession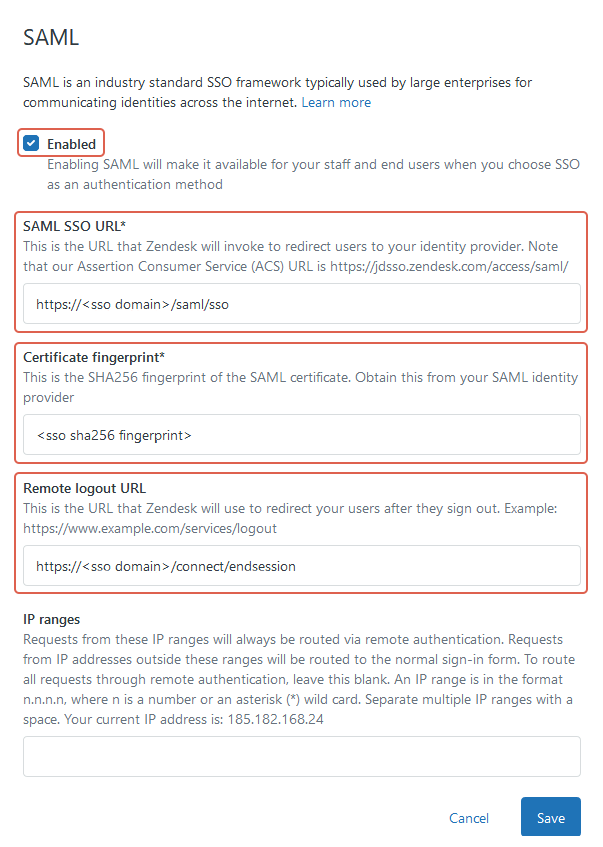
Save the form.
Activate the option External Authentication for Staff Members. Ensure that the Single sign-on option is selected.
Click Save when finished. Zendesk is now configured to use UserLock SSO.
For common issues, see Troubleshooting SSO.
If the problem persists, please contact IS Decisions Support.
If SSO temporarily fails or you need to regain access manually:
Go to
https://<yourZendeskDomain>.zendesk.com/access/sso_bypassEnter a valid email address. Zendesk will provide a bypass URL for direct login.
You can extend the security of SSO sessions by applying UserLock access policies in addition to authentication.
Apply MFA on SaaS connections to require stronger authentication.
Hour restrictions: define when users are allowed to connect.
Geolocation rules: enforce access policies based on user location.
Session limits: allow or deny SaaS logins entirely for specific users.