Enroll users with YubiKeys (HOTP)
Help users activate and use a YubiKey hardware token as a second factor of authentication (MFA) with UserLock.
YubiKeys are programmable hardware tokens by Yubico.
UserLock supports HOTP-based YubiKeys, allowing MFA without any client-side setup.
At logon, users simply touch the YubiKey — it automatically enters the one-time password, minimizing input errors.
This guide explains how to help end users enroll a YubiKey as their second factor of authentication with UserLock.
It covers the setup process, usage at login, and troubleshooting basics.
Note
🚩 Before following this guide:
We recommend reading How to implement MFA for general recommendations, communication tips, and preparation steps to ensure a smooth rollout.
A YubiKey model with HOTP support (for example: YubiKey 5 NFC or any YubiKey 5 Series.).
The YubiKey must be plugged into the USB port of the user’s computer.
Enrollment must be performed in a local desktop session (not via RDP), unless USB redirection is supported.
After enrollment, RDP logins with the YubiKey plugged into the client computer are supported.
Note
If users already use YubiKeys for other purposes (e.g., web logins), ensure a free slot is available for MFA with UserLock.
YubiKeys can store multiple credentials in two programmable slots (short touch = slot 1, long touch = slot 2).
Before enrolling, make sure that MFA is enabled for the user account in UserLock.
Note
See Access policy management to learn how to apply an access policy in UserLock.
See MFA policy reference for details on MFA policy rules and options.
When MFA is enabled for a user account, follow these steps to configure YubiKey:
Plug the YubiKey into the computer’s USB port. Do not connect via RDP for the first enrollment.
Log in to Windows.
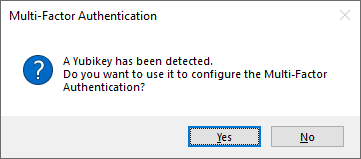
The UserLock Desktop Agent detects the YubiKey and asks whether it should be configured for MFA. Click Yes (if the user declines, TOTP setup is offered instead):
Select a YubiKey slot, then click Link YubiKey:

The Desktop Agent programs the YubiKey automatically (the MFA secret is never displayed). Click on Success button to confirm:

Touch the YubiKey (short or long press, depending on slot). The 6-digit code is entered automatically.
Enrollment is complete, and the user is logged in.
Once enrolled, MFA with YubiKey works as follows:
Plug the YubiKey into the computer’s USB port (local or RDP client machine).
Log in.
When prompted, touch the YubiKey.
The 6-digit code is entered automatically.
Click Verify and continue to complete login.
Enrollment must be done on a local desktop session.
After enrollment, users can log in through RDP with the YubiKey connected to their client computer.
If USB redirection is enabled, remote enrollment may be possible.
If a YubiKey is lost or unavailable, administrators can help using the optional Ask for help feature (disabled by default). Possible actions:
Reset the MFA key.
Temporarily disable MFA.
Assist the user in activating a new YubiKey.
If a user was previously using TOTP and now switches to HOTP:
Reset the MFA key.
Re-enroll using the First-time enrollment procedure.
Enrollment must be done locally (desktop session only).
Tokens cannot be enrolled via RDP, IIS, SaaS, or VPN sessions. After setup, they can be used for these connections.
Virtual machines: YubiKey works with VirtualBox (setup + authentication). With Hyper-V, authentication works but setup may fail.
HOTP desynchronization: If a YubiKey is used for many offline logins, its counter may desynchronize with UserLock.
By default, UserLock tolerates a drift of 6 codes.
This can be adjusted via the advanced parameter
MaxHotpCodeCount.
YubiKeys are programmable tokens created by Yubico.
They support multiple authentication methods including HOTP, TOTP, passwordless authentication, and smartcard logon.
YubiKeys have been deployed at scale since 2009 (for example at Google).
More information and case studies are available on the Yubico website.