Configure Salesforce for UserLock Single Sign-On (SSO)
Enable Salesforce Single Sign-On (SSO) with UserLock to centralize authentication, enforce corporate access policies, and simplify user access to Salesforce.
This guide explains how to integrate Salesforce with UserLock Single Sign-On (SSO) using the SAML 2.0 protocol.
Once configured, Salesforce logins are authenticated by UserLock against Active Directory, enabling administrators to enforce UserLock access policies (MFA, time, machine, or location restrictions) on Salesforce sessions.
🚩️ Before starting:
You need a Salesforce administrator account with access to Setup.
UserLock SSO must already be installed and configured.
Choose one of the two methods below:
Using the UserLock SSO metadata file (recommended)
Manual method
In the UserLock console, go to ⚙️ Server settings ▸ Single Sign-On.
Click Download ▸ SAML certificate and save the file.
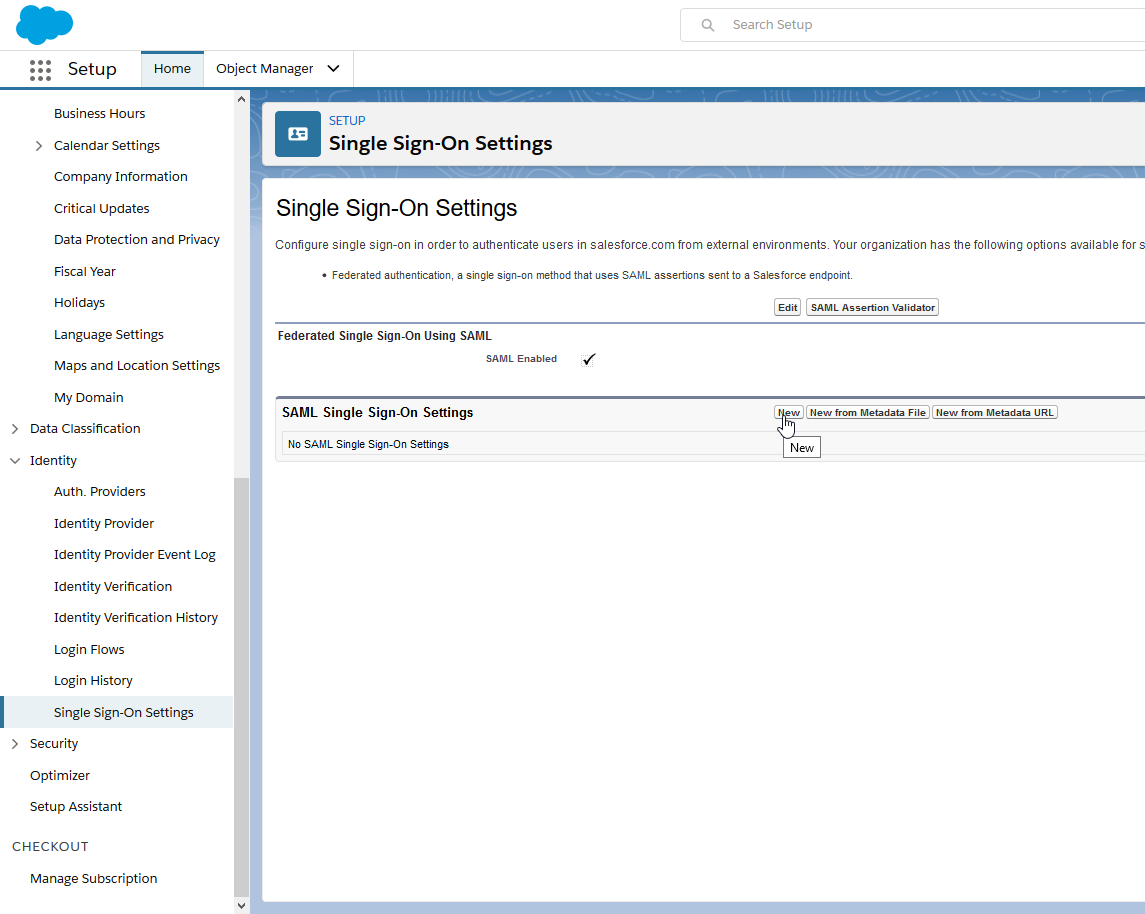
In Salesforce, go to Setup ▸ Identity ▸ Single Sign-On Settings.
Click Edit on Federated Single Sign-On Using SAML, check SAML Enabled, and Save.
Next to SAML Single Sign-On Settings, click New from Metadata File.

Select and upload the metadata file you downloaded from UserLock, then click Create.
Salesforce will pre-fill the SSO form. Review and modify the following fields as needed:
SAML Identity Type: set to Assertion contains the Federation ID from the User object.
Service Provider Initiated Request Binding: HTTP POST.
Single Logout Enabled: unchecked.
Name: optional display name.
Click Save.
In Salesforce, go to Setup → Identity → Single Sign-On Settings.
Click Edit on Federated Single Sign-On Using SAML, check SAML Enabled, and Save.
Next to SAML Single Sign-On Settings, click New.
Enter the values below:
Property
Value
Name
Preferred display name (e.g., UserLock SSO)
Issuer
UserLock SSO address
(visible in UserLock console▸ ⚙ Server settings ▸ Single Sign-On)Identity Provider Certificate
Go to UserLock console▸undefined️ Server Settings▸ Single Sign-On
Click on Download ▸ SAML certificate.
Upload the downoaded file
Request Signing Certificate
Leave default (if not using signed authn requests)
Request Signature Method
RSA-SHA256
Assertion Decryption Certificate
Leave default
SAML Identity Type
"Assertion contains the Federation ID from the User object"
SAML Identity Location
"Identity is in the Name Identifier element of the Subject statement"
Service Provider Initiated Request Binding
HTTP POST
Identity Provider Login URL
https://<SSO address>/saml/ssoCustom Logout URL
https://<SSO address>/connect/endsessionCustom Error URL
Leave empty
Single Logout Enabled
<Unchecked>
API Name
Accept default
Entity ID
https://saml.salesforce.comUser Provisioning Enabled
<Unchecked>
Click Save.
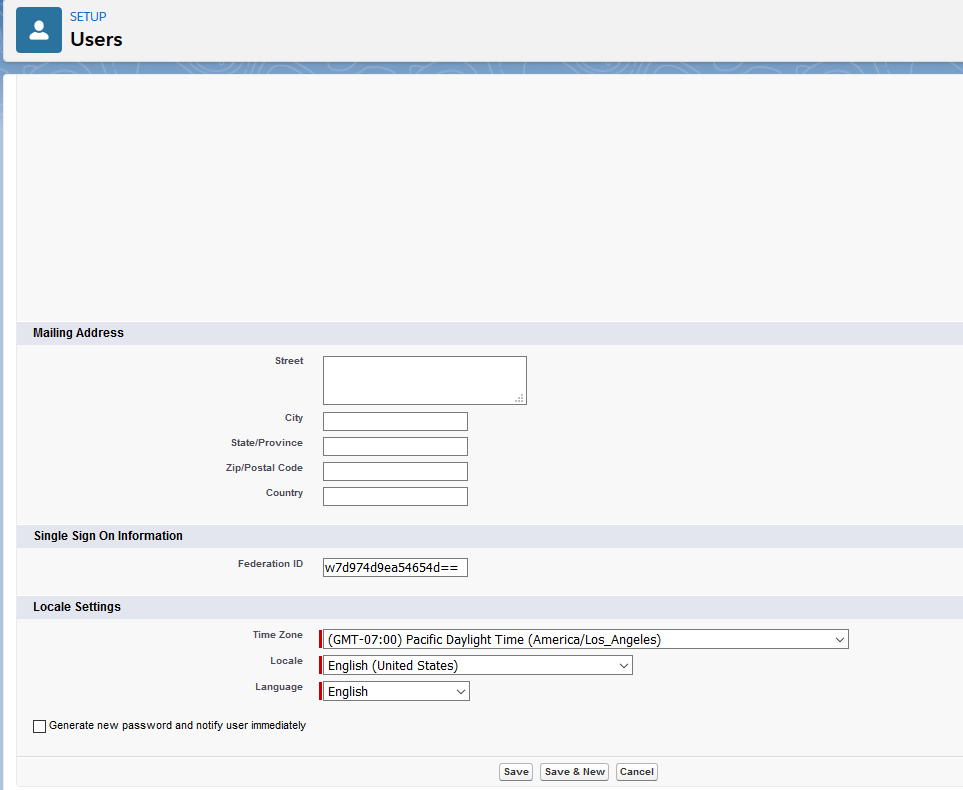
For each user that will use SSO, set their Salesforce user Federation ID to match the corresponding Active Directory ImmutableID (or the attribute you use to map accounts):
In Salesforce, go to Administration ▸ Users ▸ Users.
Click Edit on the user record.
In the Single Sign-On Information section, set Federation ID to the AD user’s ImmutableID (or the chosen mapping attribute).
Click Save.
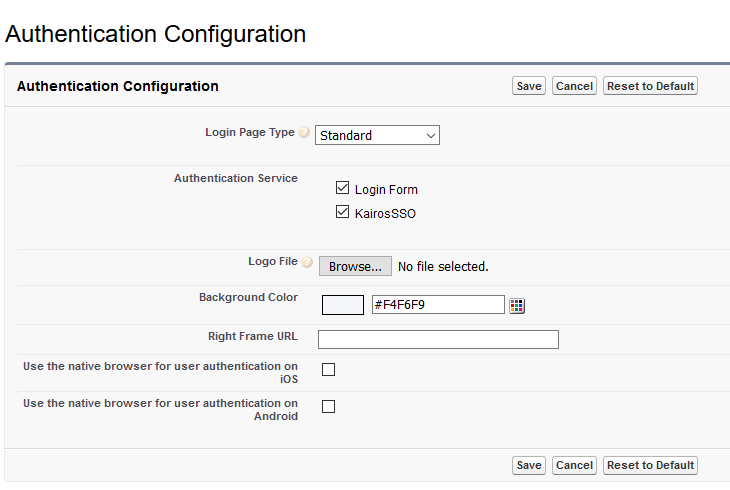
Activate SSO for your Salesforce domain:
In Salesforce Setup, go to Company Settings ▸ My Domain.
Next to Authentication Configuration, click Edit.
Check the box corresponding to UserLock SSO.
Click Save.
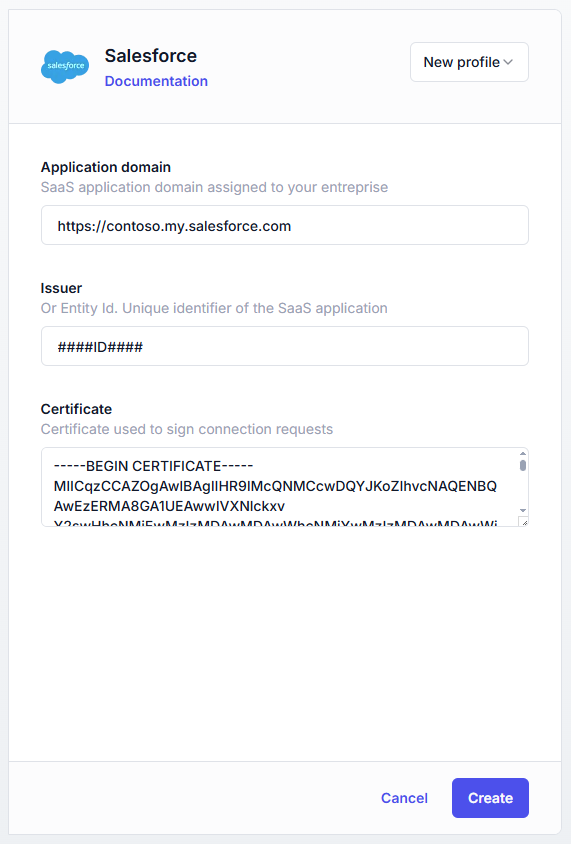
Configure the Salesforce profile in UserLock:
In Salesforce, go to Setup ▸ Security ▸ Certificate and Key Management.
Under Certificates, click on the last certificate in the list (SelfSignedCert_... .crt), then download it.
In the UserLock console, go to ⚙️ Server settings ▸ Single Sign-On.
Click the Salesforce row.
Fill in the fields with values from your Salesforce configuration:
Settings
Values
Domaine d'application
https://<yourInstance>.my.salesforce.com
(your Salesforce instance domain)Issuer
ClientId / Entity ID of the Salesforce service provider (as configured in Salesforce)
Certificate
Open the downloaded certificate with a text editor and copy the content (including
-----BEGIN CERTIFICATE-----/-----END CERTIFICATE-----)
For common issues, see Troubleshooting SSO.
If the problem persists, please contact IS Decisions Support.
If SSO is temporarily unavailable and admins need to sign in using standard credentials:
Sign in with an administrator account
Revert back to a standard Log-In sessions while SSO is unavailable.