Deploying the Desktop agent
The UserLock Desktop agent is designed to audit, control and protect workstations, servers and terminal servers.
Useful resources
The Desktop agent audits all interactive sessions activity on these machines and protects them by applying a user access control policy defined through access policy rules.
This agent has to be installed on the machines and communicates with UserLock servers to control all open requests for interactive sessions.
The easiest way to install the UserLock IIS agent is to use the UserLock console.
You will find more information here.
You can also deploy it manually through the following procedure:
Copy the agent file
The Desktop Agent runs as a Windows service under the Local System account.
Copy
UlAgentExe.exefrom the UserLock installation folder on the Primary Server
(default:%ProgramFiles(x86)%\ISDecisions\UserLock)
to the target system folder:64-bit OS:
%windir%\SysWOW64\32-bit OS:
%windir%\System32\
Copy the credential provider files (only from Windows 10 version 1809 and Server 2019) from the UserLock installation folder of the Primary server to the System32 folder of the target machine
%windir%\System32\:64-bit OS:
Copy
UlCredProv_x64.dll→ rename toUlCredProv.dllCopy
UlCredProvFilter_x64.dll→ rename toUlCredProvFilter.dll
32-bit OS:
Copy
UlCredProv.dllCopy
UlCredProvFilter.dll
Add UserLock server names in the registry
Browse to the following key::
HKEY_LOCAL_MACHINE\SOFTWARE\Microsoft\Windows NT\CurrentVersion\WinlogonCreate the following values:
Name
Type
Value
UserLockServer
REG_SZ
The name of the UserLock Primary server.
UserLockServerBackup
REG_SZ
The name of the UserLock Backup server.
For offsite computers, you might want to configure the following registry values as well:
Name
Type
Value
UserLockInternetUrl
REG_SZ
If UserLock Anywhere is enabled, create this registry value and set in its content the URL of UserLock Anywhere.
SessionsWithout NetworkLogoffAgent Internet
REG_DWORD
If UserLock Anywhere is enabled, the number of minutes the Desktop agent will wait between each request for the list of sessions to interact with.
UserLockCfg
REG_DWORD
See details in the Windows Installer package section.
Example via PowerShell:
powershell$RegKeyPath = 'HKLM:\SOFTWARE\Microsoft\Windows NT\CurrentVersion\Winlogon' Set-ItemProperty -Path $RegKeyPath -Name 'UserLockServer' -Value 'ULSRVPRI' Set-ItemProperty -Path $RegKeyPath -Name 'UserLockServerBackup' -Value 'ULSRVBAC' Set-ItemProperty -Path $RegKeyPath -Name 'UserLockInternetUrl' -Value 'https://VES1.VDE.INTRA/ulproxy' Set-ItemProperty -Path $RegKeyPath -Name 'UserLockCfg' -Value 768Note
If these values are missing, the agent cannot contact the servers and may fail at startup.
Register the Windows service
Run the following command as Administrator to register the agent service:
ULAgentExe.exe /SERVICE SStart the UserLock agent service:
net start UlAgentService
No restart is required.
UserLock 13.0 fully supports installation on Windows Server Core.
You can deploy the server and complete its configuration without using any graphical interface, ensuring a lightweight and automated setup for secure environments.
Server Core edition | Description |
|---|---|
Windows Server Core 2019 (or later) with Application Compatibility Feature on Demand | The standard UserLock Desktop Agent is used. |
Other Server Core editions | UserLock deploys the special Server Core agent :
|
In the UserLock console, go to Environment ▸ Machines.
Select one or more machines and click on the Actions button.
In the menu, click to Uninstall the Desktop agent.
In the upper right corner, the Admin action icon animates. Click it to monitor the uninstallation progress.
Stop the service and unregister it (run as Administrator):
powershellNET STOP UlAgentService C:\Windows\SysWOW64\ULAgentExe.exe /SERVICE U C:\Windows\SysWOW64\ULAgentExe.exe /UNREGISTER(Replace “SysWOW64” with “System32” on 32-bit systems.)
Once done, the agent will be completely uninstalled.
Open the UserLock console.
Go to ⚙️ Server settings ▸ Agent distribution.
Enable Automatic distribution
Set Distribution mode to Uninstall agent.
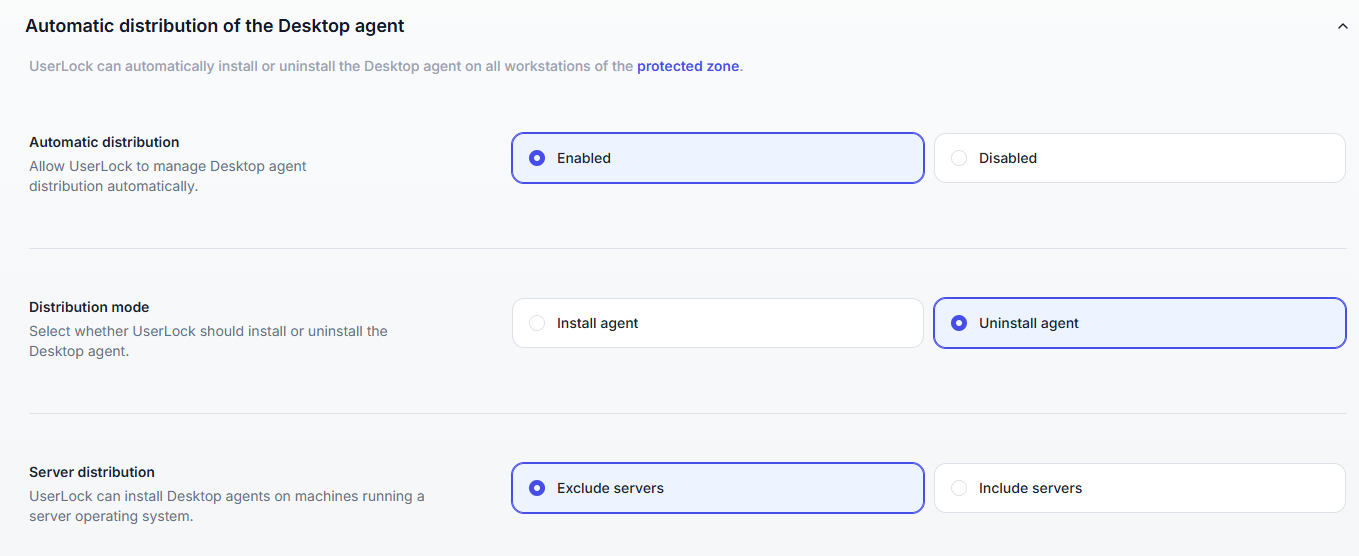
Wait until all computers show Not installed in the list.
Using the PowerShell cmdlet Uninstall-UserLockAgent.
Using the UserLockAPI methods.
See Uninstall UserLock and remove all corresponding data ("On computers with the Desktop agent" section).
The UserLock Desktop agent can be deployed through a third-party deployment solution or using Microsoft Group Policies. We provide MSI packages of the Desktop agent for this purpose:
Target OS | MSI file | Default location |
|---|---|---|
64-bit |
|
|
32-bit |
|
|
Run all MSI commands as Administrator.
By default, communication settings are not configured. You need to specify some MSI properties for the MSI package except if you deploy the communication settings with the UserLock Administration template through Microsoft Group Policies.
Silent installation
msiexec /i ULAgent_x64.msi /qn USERLOCKSERVER=YourUserLockServerName USERLOCKSERVERBACKUP=YourUserLockBackupServerNameSilent upgrade (if previously installed via MSI)
If you are upgrading from version 12.2 or earlier to version 13.0 or later:
msiexec /i ULAgent_x64.msi /qn USERLOCKSERVER=YourUserLockServerName USERLOCKSERVERBACKUP=YourUserLockBackupServerName For other cases:
msiexec /i ULAgent_x64.msi /qn USERLOCKSERVER=YourUserLockServerName USERLOCKSERVERBACKUP=YourUserLockBackupServerName REINSTALL=ALL REINSTALLMODE=vomus
3. Installation with advanced options
Include the USERLOCKCFG parameter to apply additional settings:
msiexec /i ULAgent_x64.msi /qn USERLOCKSERVER=YourUserLockServerName USERLOCKSERVERBACKUP=YourUserLockBackupServerName USERLOCKCFG=YourNeededCfgNumber
Hex | Decimal | Description |
|---|---|---|
0x002 | 2 | Displays errors to end users. |
0x010 | 16 | Prevents the Desktop Agent from sending logons denied by Active Directory. |
0x020 | 32 | Send a "lock session" event when the screensaver starts. |
0x040 | 64 | Prevent the removal of ghost (inactive) sessions on the local computer. |
0x180 | 384 | Logons without UserLock connection:
|
0x200 | 512 | Apply all restrictions (including MFA) when unlocking or reconnecting to a session. |
0x0800 | 2048 | If enabled, UserLock Anywhere is the only technology used by the Desktop Agent to communicate with UserLock servers. |
0x1000 | 4096 | If enabled, UserLock Credential Provider is enabled. |
Example:
To enable MFA on unlock/reconnect, "Ask for MFA" for logons without UserLock connection, and use the credential provider:USERLOCKCFG=4864 (which equals 0x1300).
The PowerShell script, available here, helps to know which configurations a value of "UserLockCfg" corresponds to.
msiexec /x ULAgent_x64.msi /qn You can deploy the Desktop Agent using Microsoft Group Policies (GPO).
MSI packages are provided for this purpose in the UserLock installation folder.
In addition, you can deploy agent settings and communication parameters through GPOs using the Group Policy Administrative Template provided with UserLock.
This template is compatible with all installation methods (console, MSI, manual, etc.).
Locate template files in the UserLock installation folder:
UserLock.admxandUserLock.adml(default path:C:\Program Files (x86)\ISDecisions\UserLock\) then:Copy
UserLock.admxto the "%windir%\PolicyDefinitions" folder (usually "C:\Windows\PolicyDefinitions").Copy
UserLock.admlto the "%windir%\PolicyDefinitions\<language id>" folder (usually "C:\Windows\PolicyDefinitions\en-US\").
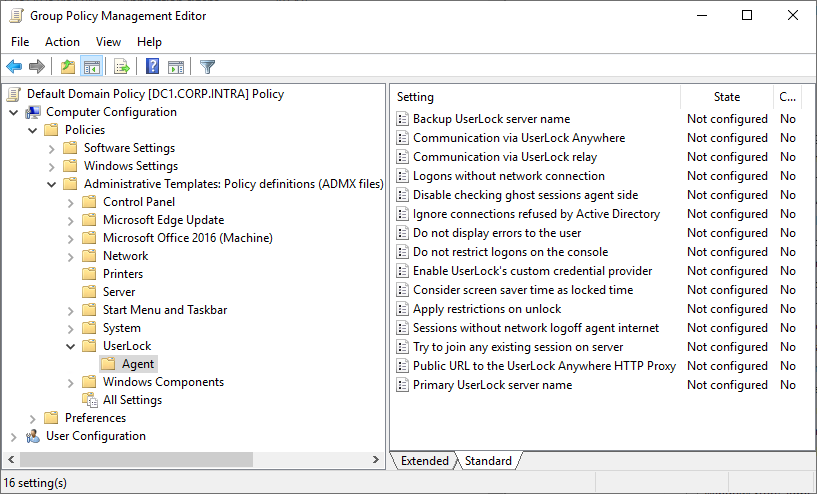
Open the group policy you wish to modify in edit mode.
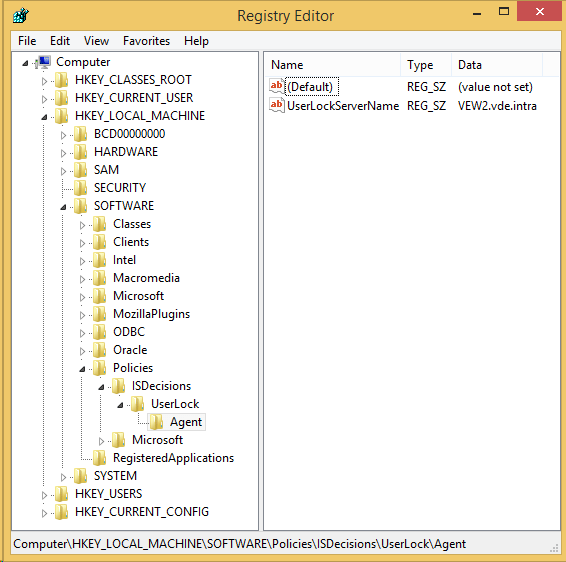
Browse Computer Configuration, Administrative Templates..., UserLock, Agent:
Open the group policy you wish to modify in edit mode.
Browse Computer Configuration, Administrative Templates..., right click then "Add...":
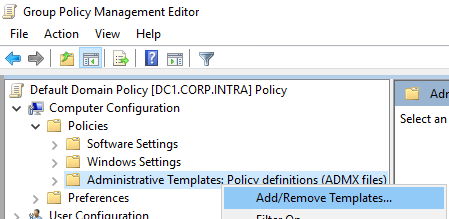
Locate the template file in the UserLock installation folder:
UserLock.adm(default path:C:\Program Files (x86)\ISDecisions\UserLock\).Browse Classic Administrative Templates (ADM), UserLock, Agent.
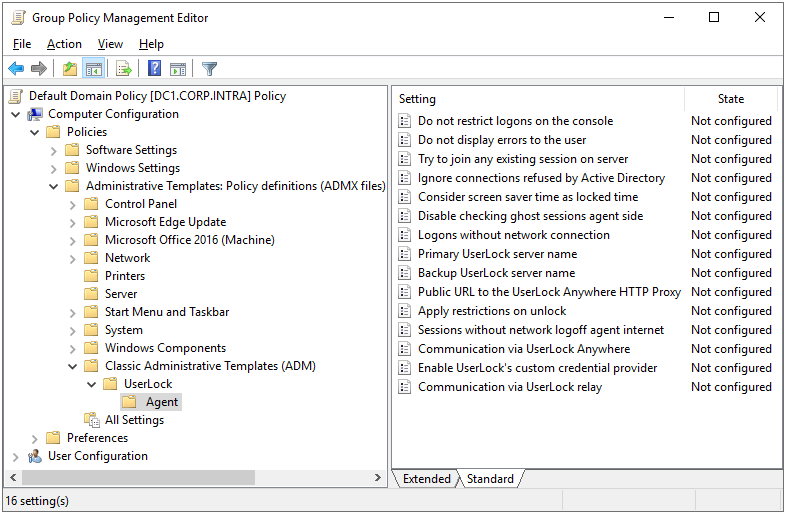
You’ll find the same settings available in the UserLock console, plus communication parameters (Primary and Backup server names).
Double-click a setting to edit its properties, for example:
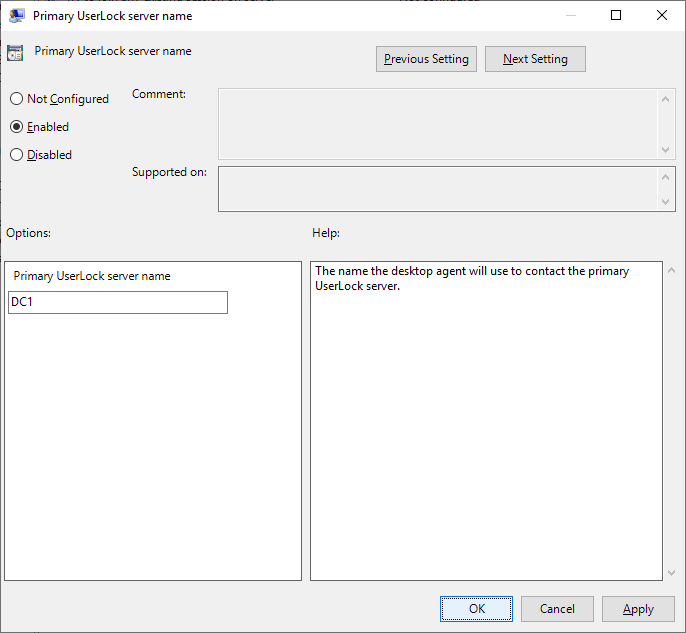
On affected computers, all configured values are deployed to the registry key:HKEY_LOCAL_MACHINE\SOFTWARE\WOW6432Node\Policies\ISDecisions\UserLock\Agent (on 32-bit target OS: HKEY_LOCAL_MACHINE\SOFTWARE\Policies\ISDecisions\UserLock\Agent)
Note
During some Windows updates, Microsoft sometimes resets the Winlogon key, which can cause some UserLock values to disappear. Deploying agent and communication settings via Group Policy Objects (GPOs) is a solution to avoid this issue.
Note
The agent prioritizes agent and communication settings via GPOs over those stored in the Winlogon key.
To install the Desktop agent in an environment using VDI, please follow this guide.