Configure Slite for UserLock Single Sign-On (SSO)
Enable Single Sign-On (SSO) for Slite with UserLock to centralize authentication, apply access policies, and streamline user access to your organization’s workspace.
This guide explains how to integrate Slite with UserLock Single Sign-On (SSO) using the OAuth 2.0 protocol.
Once configured, Slite logins are authenticated by UserLock against Active Directory, allowing administrators to enforce UserLock access policies (MFA, time, machine, or location restrictions) on SSO sessions.
🚩️ Before starting:
You must have an active Slite organization account.
UserLock SSO must already be installed and configured.
In the UserLock console, go to ⚙️ Server settings ▸ Single Sign-On.
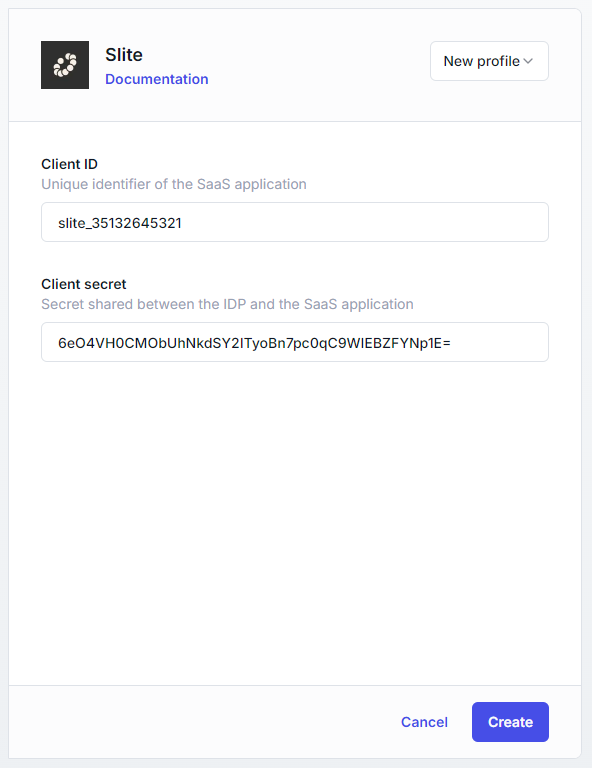
In the list of applications, select Slite.
Fill in the fields with the following values:
Settings
Values
Client ID
Slite’s unique identifier. You can enter any custom value, such as
slite_35132645321orslite_contoso.com.Client Secret
Secret key shared between Slite and UserLock SSO.
You can use the suggested secure secret or define your own.👉️ Keep both values on hand, you’ll need them when configuring Slite.
Save the profile.
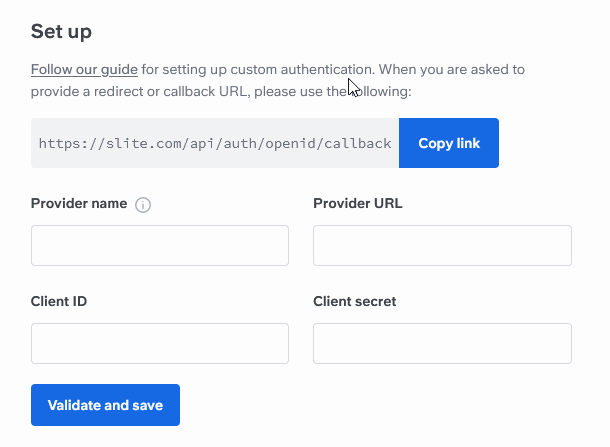
Open your browser and go to:
https://<your_slite_domain>.slite.com/app/settings/organization/authentication
(Replace<your_slite_domain>with your Slite subdomain.)In Provider Name, enter UserLock SSO (or another descriptive name).
This name will appear on the login screen for end users.In Provider URL, enter your UserLock SSO server URL
(IdP Issuer URL, e.g.https://sso.contoso.com)In Client ID, enter the value defined in UserLock.
In Client Secret, enter the corresponding secret key.Click Validate and save to finalize the setup.
For common issues, see Troubleshooting SSO.
If the problem persists, please contact IS Decisions Support.
If validation fails in Slite, an error will appear in the browser URL under the sso_setup_failure field.
Example:
SequelizeUniqueConstraintError — The user performing the setup in Slite is not the same as the user identified by the SSO validation process, and that user already exists in Slite (as a member or invited user).
→ Remove this user from Members or Invitations, then retry.
Alternatively, perform the setup with the same user on both sides.
You can extend the security of SSO sessions by applying UserLock access policies in addition to authentication.
Apply MFA on SaaS connections to require stronger authentication.
Hour restrictions: define when users are allowed to connect.
Geolocation rules: enforce access policies based on user location.
Session limits: allow or deny SaaS logins entirely for specific users.