E-mail tab - Set an alert
The “E-mail” tab allows you to define the e-mail message and recipients for this alert.
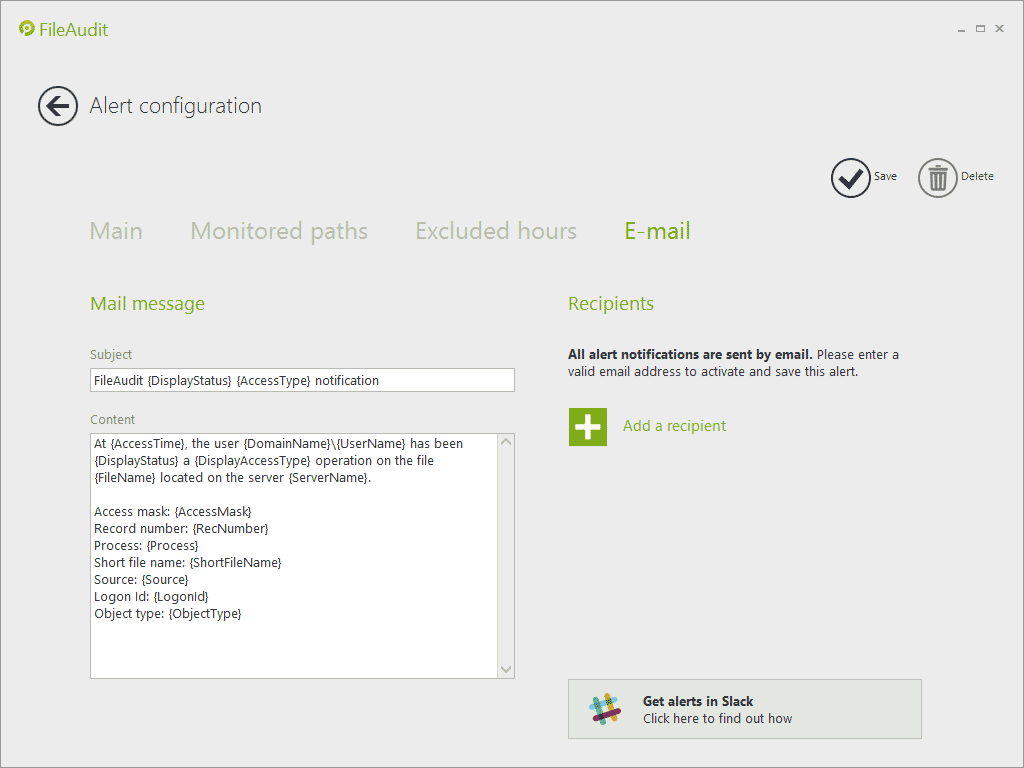
The message
The content of the e-mail message can be personalized. You can modify the ‘Subject’ and ‘Mail’ templates as desired. The dynamic variables are enclosed in square brackets { }. The message is different regarding the type of alert: single or mass.
Definitions of dynamic variables
Single access alert:
- AccessMask: Display the requested access rights.
- AccessTime: Display the time of the access attempt.
- DisplayAccessType: Display the access types.
- DisplayStatus: Display the status of the access attempt (‘Granted’ or ‘Denied’).
- DomainName: Display the user domain name.
- FileName: Display the full path of the file accessed.
- LogonId: Display the user login.
- Process: Display the process(s) used to access the file. This information is available only if the access is done locally on the audited system.
- RecNumber: Microsoft Security log record number. Only display/use for technical support purposes.
- ServerName: Display the server name hosting the file in question.
- ShortFileName: Display the name of the file.
- Source: Display the name or IP address of the machine source.
- UserName: Display the user account name.
- ClientName: Display the client name.
- ClientAddress: Display the client IP address.
Mass access alert:
- CountLimit: Display the number of access beyond which the alert will be triggered if achieved over the defined time period (alert settings).
- DisplayAccessTypes: Display the access type.
- DisplayAccessStatus: Display the status of the access attempt (‘Granted’ or ‘Denied’).
- DomainName: Display the user domain name.
- EffectiveCount: Display the number of events detected during the {EffectiveTimePeriod}.
- EffectiveTimePeriod: Display the time period during which the {EffectiveCount} number was counted.
- EventTime: Display the time when the threshold has been reached.
- LatencyPeriod: Display the time period during which the alert will be temporary disabled once triggered (alert settings).
- TimePeriod: Display the rolling time period during which the number of access is counted (alert settings).
- TopFolders : Display the path of the top-level folders where the mass access events have been generated.
- UserName: Display the user account name.
- ClientNames: Display the clients names, separated by coma.
- ClientAddresses: Display the client IP addresses, separated by coma.
The recipients
All previously-defined recipients of scheduled reports or alerts are stored as general parameters by FileAudit, allowing you to select existing recipients from this list. Alternatively, new recipients can be added.
Create a new recipient
To create a new recipient, click on ‘Add a recipient’. This will bring up a panel on the right-hand side of the screen. Directly enter a name and valid e-mail address for the recipient, and click on Validate to add this contact to the ‘Recipients’ list:
Pick up a recipient
-
To select an existing recipient, click on the ‘Pick up’ button. The stored FileAudit recipient contacts will be displayed in a pop-up. Select the desired recipient and click ‘OK’:
-
The stored information for this contact (name, e-mail address) will be displayed on the right panel and can be modified if needed.
When satisfied that this information is current, click on ‘Validate’:
-
These steps can be repeated to add further recipients as required:
Receive alerts via Slack
If your organization is using Slack, you may be interested in receiving your FileAudit alerts directly on Slack. Go to this page to see how to configure this.