Define an alert on an audited path
FileAudit e-mail alerts can be automatically and immediately triggered when specific access events are detected. There are two types of alerts available: Alerts on single access and alerts on mass access:
- A ‘Single access' alert is triggered to notify a predetermined access event corresponding to specific criteria. The alert is triggered the defined criteria are matched.
- The 'Mass access' alert brings an additional criterion to those available in the 'Single access': the frequency with which accesses are performed by the same user. This alert is triggered when the tolerated threshold is reached for a defined period of time.
Single access alert
-
Once FileAudit has displayed the results of the audit configuration for your target folder, you can define from here a ‘Single access’ alert. You will find on the right-hand side the tile named ‘Add an alert’. Click on it.
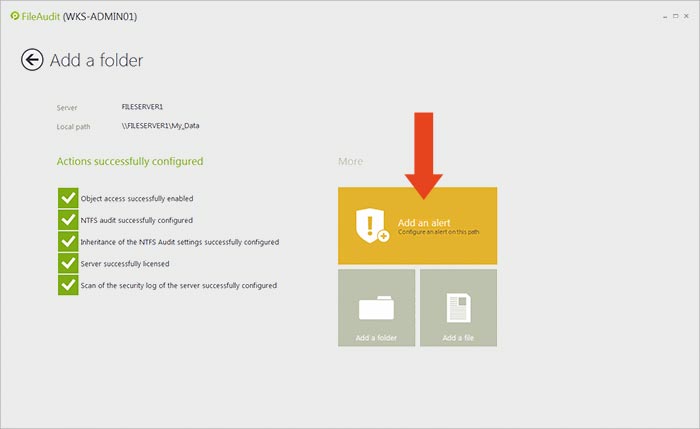
FileAudit will switch to the ‘Alert’ configuration section for the specific audited folder previously set. In this example, we will define an alert triggered for a successful deleted event on ‘My_Data’ folder.
-
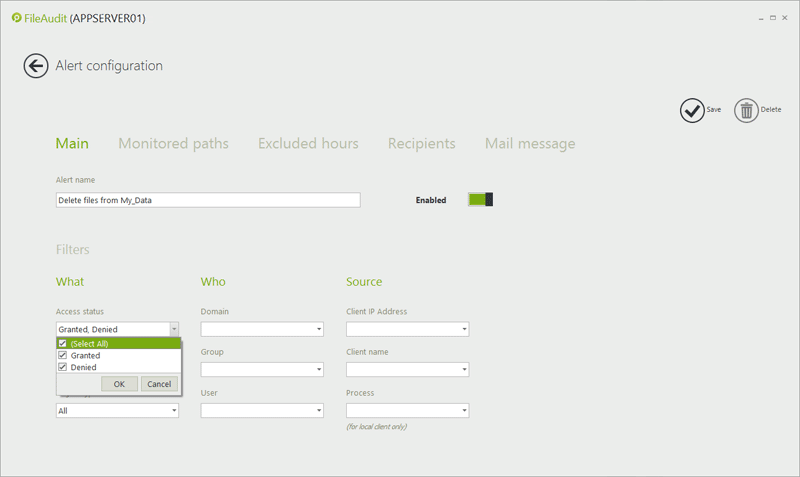
The first ‘Main’ tab allows you to define the event that will trigger the E-mail alert. FileAudit can send an alert when the access has been granted or denied. In our example, we will choose to receive this alert for any attempt of file deletion. In the ‘Status’ field, check the ‘Granted’ and ‘Denied’ box.
-
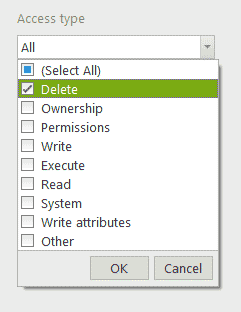
Select then the ‘Delete’ access type. Take note that the event is generated for an attempted access. If a user attempts to delete a file on a monitored folder without sufficient rights, you will be alerted about a ‘Delete’ access event with a status ‘Denied’.
The final parameters allow for the definition of a specific ‘Domain’, 'User' and/or 'Source' to trigger an alert. The fields 'Domain’, ‘User' and 'Source' should be kept empty if you want to be alerted for any 'Domain’, ‘User' or 'Source' that generates an event.Take note: The 'Source' field allows you to specify the name of the process generating the access attempt when the file/folder is accessed locally (i.e. on the machine hosting the file/folder) or the IP address of the machine from which the access has been performed when the access is performed through the network.
-
The switch of the 'Main' tab permits to enable/disable this alert.

-
The ‘Monitored paths’ section is already defined as we created this alert just after having set the audit on the path. This ‘Alert’ will be sent if any user successfully deletes a file or a folder in ‘My_Data’.
-
We will now define a recipient for this alert. Click on the ‘Recipients’ tab.
To create a new recipient, click on ‘Add a recipient’. This will bring up a panel on the right-hand side of the screen. Directly enter a name and valid e-mail address for the recipient, and click on Validate to add this contact to the ‘Recipients’ list. You can reproduce this action to add several recipients.
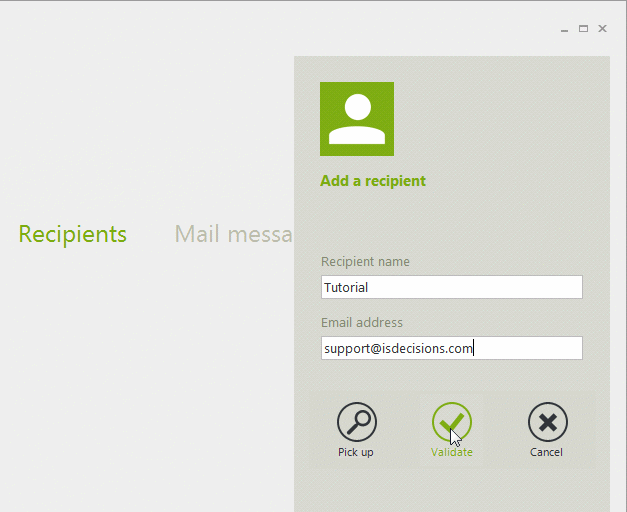
Take note: All previously-defined recipients of scheduled reports or alerts are stored as general parameters by FileAudit, allowing selection of existing recipients from this list. -
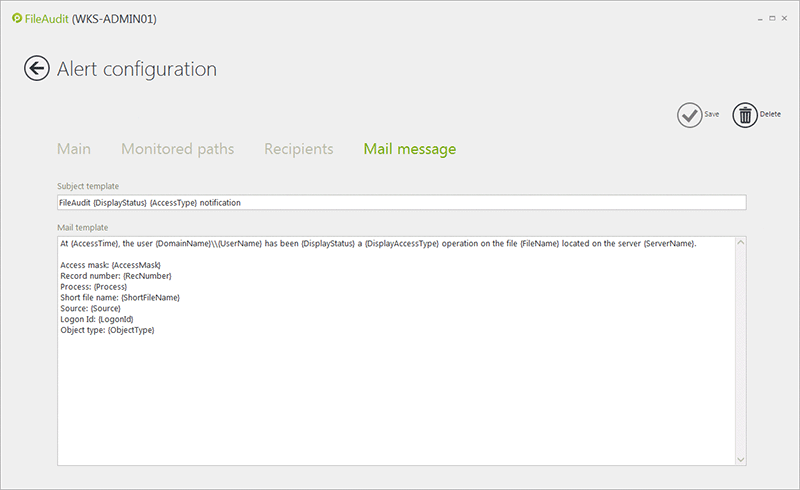
The content of the e-mail message can be personalized via the ‘Mail message’ tab. The dynamic variables are enclosed in square brackets { }. Their definitions are available here.
-
Once all configuration tabs are defined as required, click ‘Save’. This alert will be directly activated.
-
When you add an alert, FileAudit checks if the required E-mail settings are defined to send this alert. Until now, we have not defined the E-mail server settings and from which E-mail box the alert will be sent. That is why this popup is displayed when you clicked on ‘Save’.
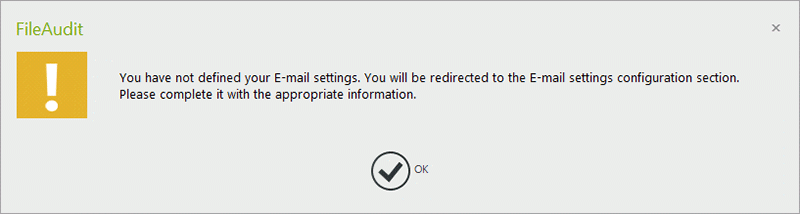
-
Clicking on ‘OK’ will redirect you to the ‘E-mail settings’ section from FileAudit ‘Settings configuration’. Enter your SMTP server, the port to use and the E-mail sender’s address (requires an existing address).
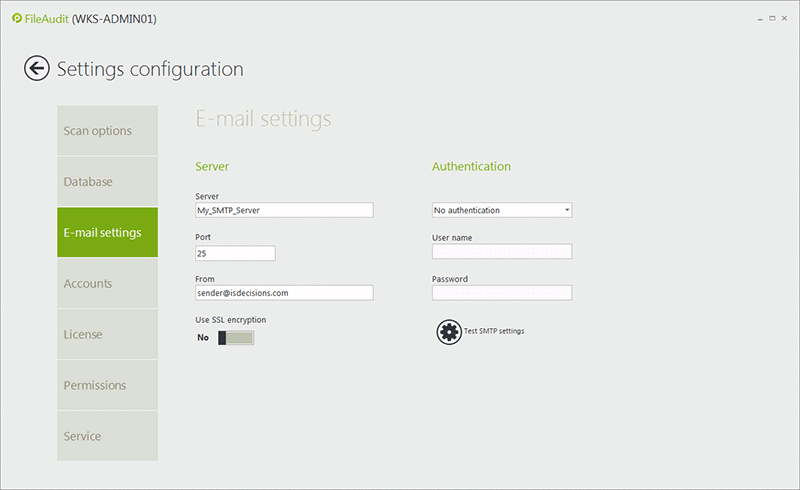
Validate the configuration by clicking on the back arrow button which will bring you back to the FileAudit Hub.The audit and the alert are now set on ‘My_Data’ folder. Let’s see now the file access events generated for this folder
Please note
You can also create an alert directly from the FileAudit Hub clicking on the ‘Alerts’ tile.
Mass access alert
-
This type of alert is triggered by certain mass access events performed by the same user. Alerts to bulk file copying are when a significant number of read accesses are performed during short period of time. Alerts to bulk file deletion or movements are when a significant number of deletions are performed during a short period of time.
You can create a mass access alert via the ‘Alerts’ tile in the FileAudit hub.

-
This alert type proposes the same criteria as those available when defining a 'Single access' alert and described previously. In addition the frequency criteria determine the number of accesses performed of the same type by the same user

These frequency criteria are:- Threshold: The number of accesses, corresponding to the criteria defined in this tab, beyond which the alert will be triggered.
- Time period: The defined period of time for the number of accesses corresponding to the criteria in this tab.
- Latency period: The time period during which the alert will be temporary disabled once triggered. Enter '0' as value to disable the latency period. Take note that disabling the latency period means that the alert will be triggered for each event over the threshold.