Configure email settings
Set up the SMTP server and authentication mode FileAudit uses to deliver scheduled reports, service warnings and real-time alerts by email.
This guide covers two distinct paths, depending on what your SMTP server requires:
Path | When to use it | Section to follow |
|---|---|---|
Standard authentication | Your SMTP server accepts anonymous connections, Windows authentication, or a username and password (internal relay, hosted mail server) | |
OAuth2 | Your provider has phased out basic authentication, such as Microsoft 365 and Google Workspace |
Identify your path first, then make sure you have:
Access to the FileAudit console with permission to change settings.
Your SMTP server details: address, port, and the authentication method it accepts.
A sender email address allowed to send through this SMTP server.
Use this path for any SMTP server that does not require OAuth2: an internal relay, a hosted mail server, or a provider that still accepts basic authentication.
In the FileAudit console, open Settings and select E-mail settings.
In Server, enter the address of your SMTP server.
In Port, enter the port your server uses.
Common value
Description
25
Default, unencrypted
465
Implicit SSL
587
Modern submission port
In Sender E-mail, enter the address that will appear as the sender of reports and alerts.
Set SSL encryption to Yes if your server requires an encrypted connection.
In Mode, select the authentication your server accepts:
Common value
Description
No authentication
The server accepts anonymous connections. Typically an internal relay restricted by IP address.
Windows authentication
FileAudit connects with the credentials of the FileAudit service account. Use it when your SMTP server accepts that Windows account.
Provide credentials
Enter a dedicated username and password for the SMTP connection.
Click Save.
Then send a test email (see below).
Use this path for providers that require OAuth2, such as Microsoft 365 and Google Workspace.
Register an application with your provider to obtain a Client ID and Tenant ID/Client Secret:
Microsoft: Register a Microsoft Entra app for OAuth2 Guide
Google: Register a Google Cloud app for OAuth2 Guide
Other providers: refer to your provider's documentation.
Install the Microsoft Edge WebView2 component on the console machine, from an elevated prompt so it is installed per-machine and not per-user.
Note
Webview2 is preinstalled on Windows 11 devices, but must be installed manually on Windows Servers and on some Windows 10 devices. The latest version can be downloaded from Microsoft's official website
Open Settings and select E-mail settings.
In Server, enter your provider's SMTP address (
smtp.office365.comfor Microsoft,smtp.gmail.comfor Google), and in Port, enter the submission port, typically 587.In Sender E-mail, enter the account linked to your registered application.
Set SSL encryption to Yes.
In Mode, select OAuth2.
In Client ID, enter your application's client ID. In Password, enter the associated secret: the Tenant ID for Microsoft, the Client Secret for Google or another provider.
Click Sign in.
In the sign-in window, enter the same account as in Sender E-mail.
Consent to the requested permissions.
Check that Status shows you are signed in, then click Save.
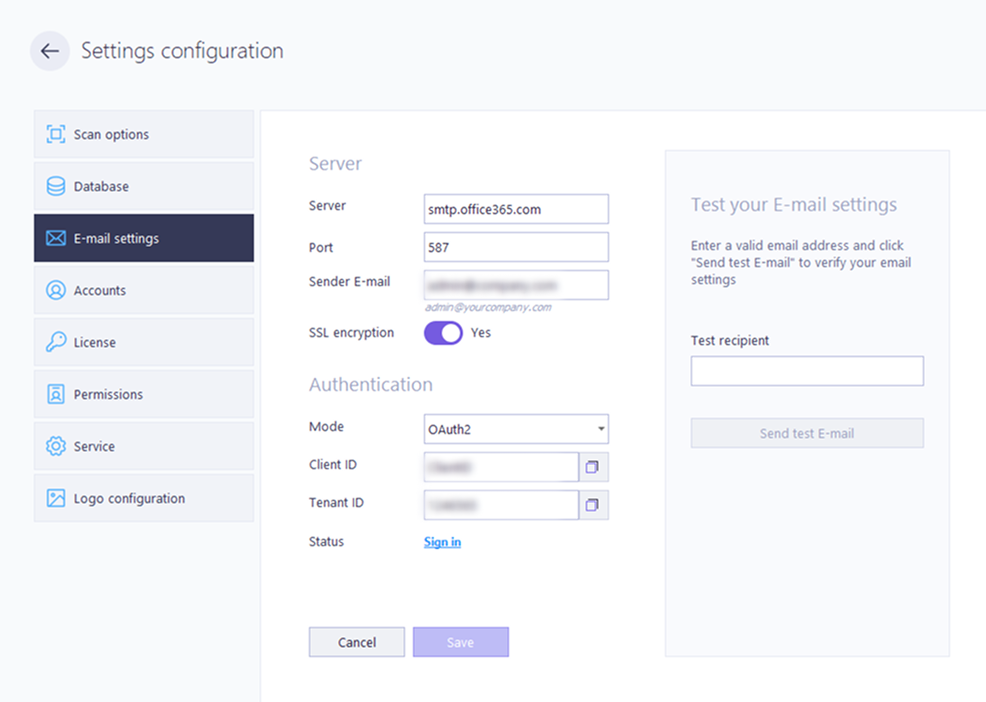
In the Test your E-mail settings panel, enter a valid address in Test recipient.
Click Send test E-mail.
Check the recipient's inbox.
Authentication fails: check that the mode matches what your server accepts. Microsoft 365 and Google reject basic authentication on most tenants; use OAuth2.
Connection fails or times out: verify that the port is open between the FileAudit server and the SMTP server. Some networks block outbound port 25.
OAuth2 sign-in does not work: make sure WebView2 is installed per-machine (from an elevated prompt), not per-user.
Test email received but alerts or reports are not: the SMTP configuration is correct; check the recipients defined in your alerts Reference or scheduled reports Guide.